Optimize Tab
This section introduces each feature of the Optimize Tab.
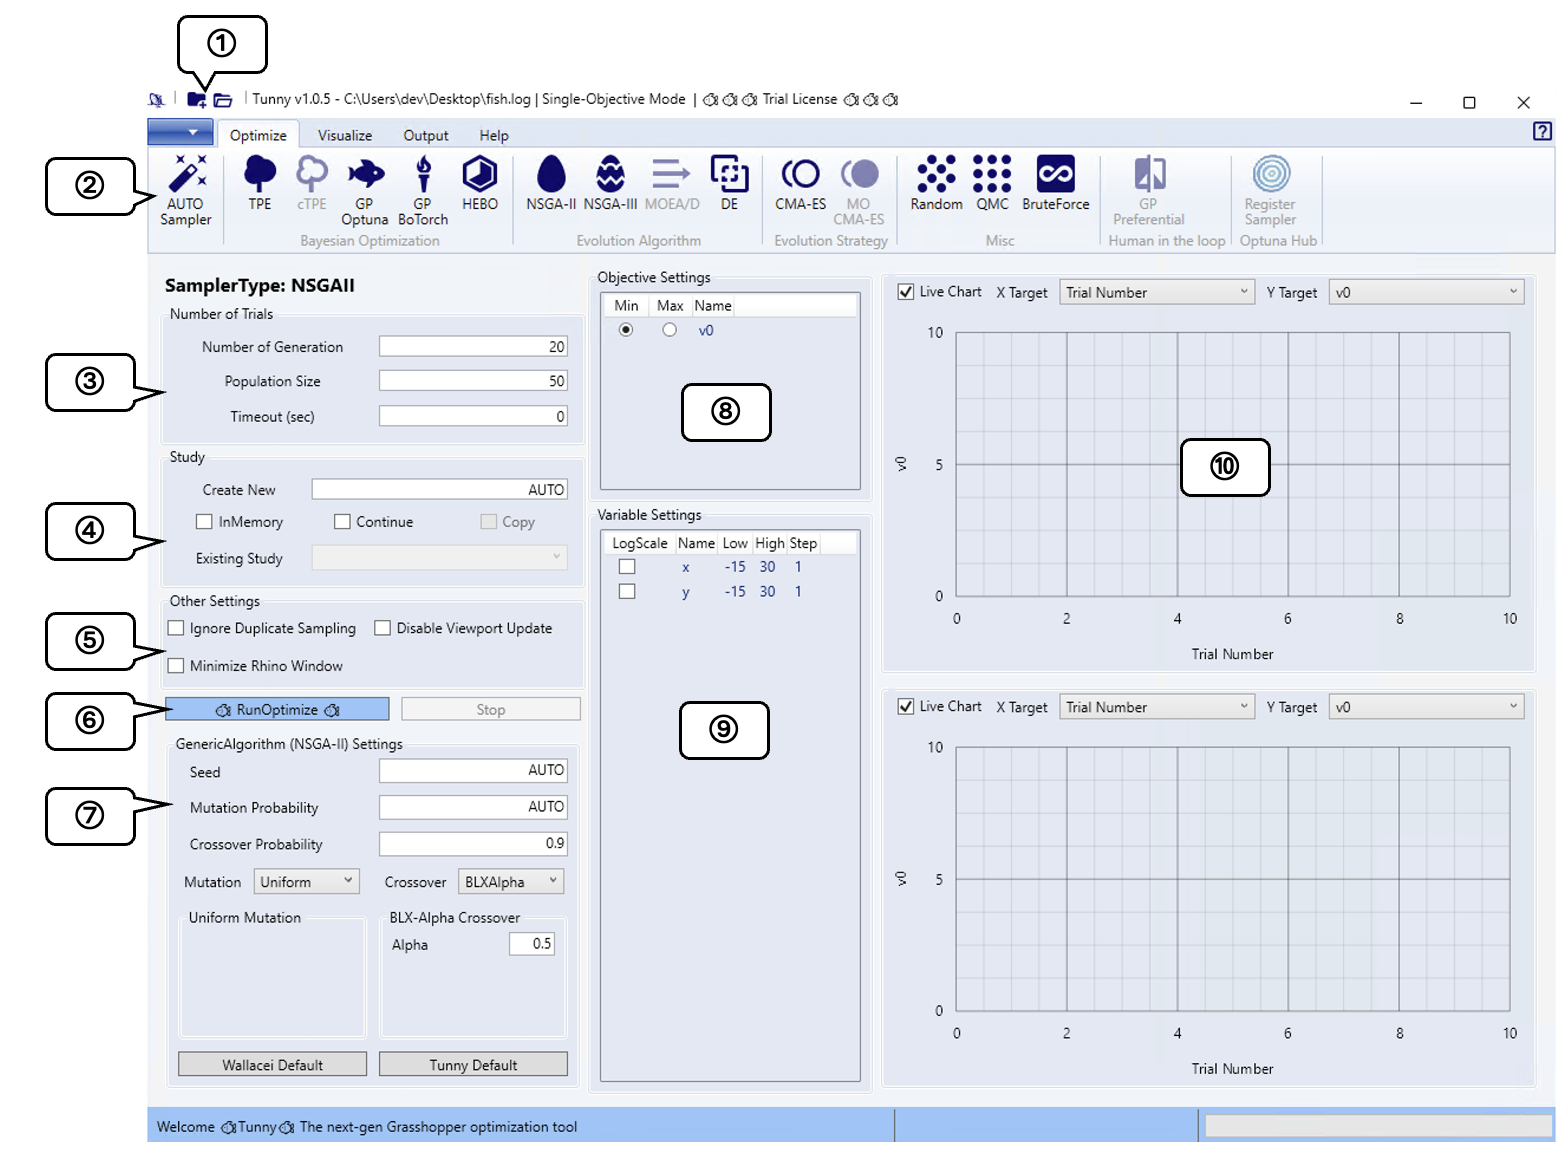
① Quick Access
Press the left icon to specify a new result save file. Press the right icon
to open an existing result save file.
The section marked .../fish.log indicates the path to your current result
storage file.
The section marked ... Mode shows the current optimization mode, which
automatically adjusts based on the type of objective function and whether
constraints are present, enabling only the applicable optimization methods.
② Optimize Tab
List of available optimization methods. The available optimization methods vary
by optimization mode. For method selection guidelines, refer to
How to Select Sampler.
③ Number of Trials
Configures the number of trial iterations. Display formats differ between GA and other optimization methods.
For GA-based methods, specify both the number of generations and population size per generation, similar to Wallacei or Galapagos. For all other methods, specify the total number of trials.
If you set Number of Trials "negative int" or "inf", continue optimization
indefinitely
If the optimization time exceeds the Timeout limit, the optimization will be
stopped.
④ Study
Configure settings for the Study that represents a collection of optimization trials.
When creating a new Study, specify the name using Create New. Setting it to
AUTO will automatically generate a name.
Checking InMemory saves optimization results to memory during execution and
writes them to a result file after all optimizations complete. As a result,
optimizations will run faster compared to not using this option. However, since
results aren't saved during optimization, if optimization is interrupted midway,
you'll lose the ability to review the results afterward. When optimization
completes normally, a confirmation dialog will appear asking whether to save the
results to file.
Continue allows you to resume an existing Study. If you wish to continue
optimization based on existing results, check this option and select the Study
you wish to continue from Existing Study combo box.
Copy creates a copy of the target Study and continues with it under a new
name.
⑤ Other Settings
To speed up optimization, you can configure settings to stop rendering or prevent redundant sampling. Since optimization may become unstable, this feature is disabled by default.
⑥ Run & Stop Button
You can initiate and terminate optimization processes.
When you press the Stop button, Tunny creates an empty file named quit.fishing
in the .tunny_env folder where its configuration files are located. The
presence of this file serves as the condition for Tunny to determine that
optimization should be stopped.
Therefore, if your TunnyUI becomes frozen, you can manually stop the
optimization process by creating the quit.fishing file yourself.
⑦ Sampler Detail Settings
Tunny uses the Optuna sampler as is. Please refer to the Optuna sampler page listed in the table below for the each value of the sampler settings.
In most cases, using the default settings provides performance that meets or exceeds requirements.
NSGA-II, SPEA-II, and HypE provide preset configuration buttons for common
optimization strategies. The Exploitation Default preset focuses on refining
known good regions, while Exploration Default prioritizes discovering new
areas of the search space. For NSGA-II, a preset matching Wallacei's default
settings is also available—though this is designed to be as close as possible
rather than an exact replication of the implementation.
⑧ Objective Settings
Displays the name and optimization direction of the objective function. By
default it's set to minimization; to check Max if you want to maximize
instead.
⑨ Variable Settings
You can check the settings for each variable.
Low, High, and Step display the settings for the NumberSlider. For
categorical variables using TunnyValueList, these settings will not be
displayed.
By default, sampling is performed on a linear scale. Checking LogScale will
perform sampling on a logarithmic scale.
Linear scale uses variables as their direct values for cases with clear value ranges, while logarithmic scale transforms variables to log(x) for efficiently searching across multiple orders of magnitude.
⑩ Live Chart
Allows real-time visualization of optimization results. Axis values can be modified by selecting from a combo box. When using single-objective optimization, the second Live Chart is disabled (unchecked) by default.